So after a few weeks of complaining about Microsoft and Windows something happened. Quite by accident, I visited the Edraw Max website only to discover that they now have a Linux version of the software. Now I could live my Ubuntu fantasy or so I thought.
After a few minutes of using the open source video driver. I was about ready to pull my root hairs out. After hours of work I finally figured out how to install the official Intel graphics driver and the internet was not really that helpful.
The TLDR version
This is a guide about how you can install the latest Intel graphics driver in Ubuntu 16.04. I constantly digress to tell you how awesome I am; because I am totally awesome but you will find it helpful if you are using Ubuntu on a computer with the Intel Graphics chips e.g. HP laptops.
Why Ubuntu 16.04?
It’s an LTS (Long Term Support) edition which will receive updates until April 2021. In other versions, support only lasts for 9 months. Change is distracting.
Why do I need this driver anyway?
After installing Ubuntu your system will be using open source graphics. The developers at Ubuntu have worked really hard to make sure that you will have some sort of working desktop even when there are no drivers. The experience, however, is not ideal.
Some of the annoyances of not installing graphic drivers are quite cosmetic. A rubbish desktop that is not so crisp looking, resolution not living up to its billing etc. Often times lacking proper drivers can be catastrophic for example you want to close your laptop lid and go for a break. When you come back you are met with a black screen no matter what you do.
YouTube videos flicker, you cannot make screencasts, you cannot take screenshots without kittens dying on your screen, your software is busy chewing through some of your processor’s power instead of the GPU wasting resources. You cannot play awesome games.
You cannot use the HDMI port. Need I go on?
You need a graphics driver made by the people who made your graphics card.
So how do you go about it?
This part is easy and well documented all over the web.
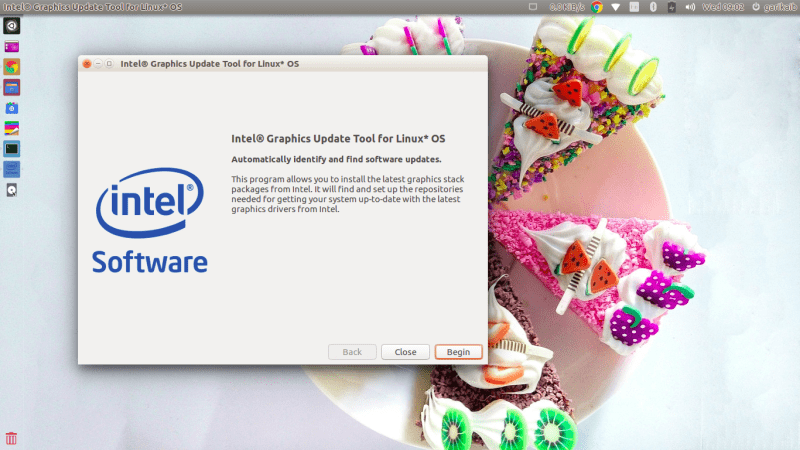
- Go to the web Intel Website drivers website and download the installer for your platform.
- For most people, the 64-bit installer should do it.
- Once it has finished downloading, double-click on the installer and click on begin
- Click on install
- The installer will download and install the drivers for you. It will also add the Intel repository in /etc/apt/ for future updates
The undocumented part
- You will need to launch the additional drivers’ app and install the Intel firmware
- Restart your computer
You are still not done
Now we get to the slightly hairy part. Not so long ago Microsoft (I know they love Linux now) decided to make things difficult and introduced secure boot. What it all means is that you will need permission (signed binary) from Redmond if you want to mess with the boot process. It protects devices from certain types of malware but it also complicates things.
The way of installing drivers we have just outlined above works by using the DKMS (Dynamic Kernel Module Support) framework. What it means is that drivers (modules) are created on the fly on your system. The system cannot load them unless they are signed if you are using Secure Boot and there is no easy way for the Kernel to sign them.
To use the drivers you have to secure boot mode.
- sudo update-secureboot-policy
- Select yes in the ncurses dialog
- Enter a temporary password as asked and confirm it
- Reboot the system
- You will be presented with the MOK management dialog countdown when system starts, press any key to activate it
- You will be asked to enter the password. You will not usually be asked for the entire password. To make sure you are paying attention you are asked for random characters from your password e.g. “Enter the third letter of your password” Be sure to press enter after typing each letter.
- Select yes to disable Secure Boot
- You should boot into your awesome desktop which can allow you to do all sorts of things including suspend/sleep, transparency, screenshot and screencasting etc
NB Should you be unhappy with this procedure for some reason you can enable Secure Boot using the command: sudo update-secureboot-policy –enable in the terminal.
Final words
I really hope you will find this guide useful. If there are any errors or typos, whatever you need to add please feel free to leave a comment.


Comments
3 responses
I tend to do the old fashion way of disabling UEFI booting by pressing F9, then go to boot options, once in, l press F5 to enable or disable UEFI booting, then press F10 to save the settings, done.
But if you are dual booting, most of the time Micro$haft updates their OS, then always enable it and you will be faced with black screen with “No disk found” error. Just go through the process again.
You left the actual part of installing driver, do you first install the driver and disable the secure booting or the other way round?
Why Ubuntu 16.04?
I would further say Ubuntu LTS versions are meant for business and people who do not want changes to their OS every 6 months. LTS are stable versions which only gets security and critical updates without altering the OS which might affect business users.
Other Ubuntu versions are for enthuasiasts who are always chasing cutting edge changes and tech
The Installer (a .deb) takes care of the installation process. Then you will have to disable UEFI to allow the driver to load.
Great tutorial thanks. Would this solve the issue of a trust flex drawing pad not working on 16.04? I’m using a hp pavilion dm 1 which has Intel installed. I had to downgrade back into 15.10 as the cursor disappeared on hovering so I had no idea where it would land – my drawing is unpredictable enough without this blip, lol. Any advice? I can’t find anything to help. Thanks in advance